4 Fun Ways to Teach Elementary Music Classroom Rules
Back-to-school season means teaching rules and procedures. Use rhythm activities to make learning elementary music classroom rules FUN!
Some of the links on our site are affiliate links. If you click on a link and make a purchase, we may earn a small commission.
Teaching music classroom rules and procedures doesn’t have to be BORING. Teachers and students shouldn’t dread this vital step to establish a positive classroom climate and set the stage for a productive school year.
Believe it or not, teaching rules and procedures is one of my FAVORITE classroom activities! I especially enjoy using instruments with Kindergarten kiddos on their second day of music class. The look of DELIGHT on their faces lets me know these kids are already hooked. The silly stumbles we have along the way are an expected part of the learning process.
What’s in this Post? Click to Open Table of Contents
Keep it Simple and Limit Your Classroom Rules
Teaching your rules and procedures through Rhythm Rules Activities lays a musical foundation and teaches music skills on the first day of school and beyond. But, don’t overcomplicate things. After all, you’re teaching young children. Choose rules that are broad, simply worded, and direct. I’ve successfully used these four rules in my classroom for many years.
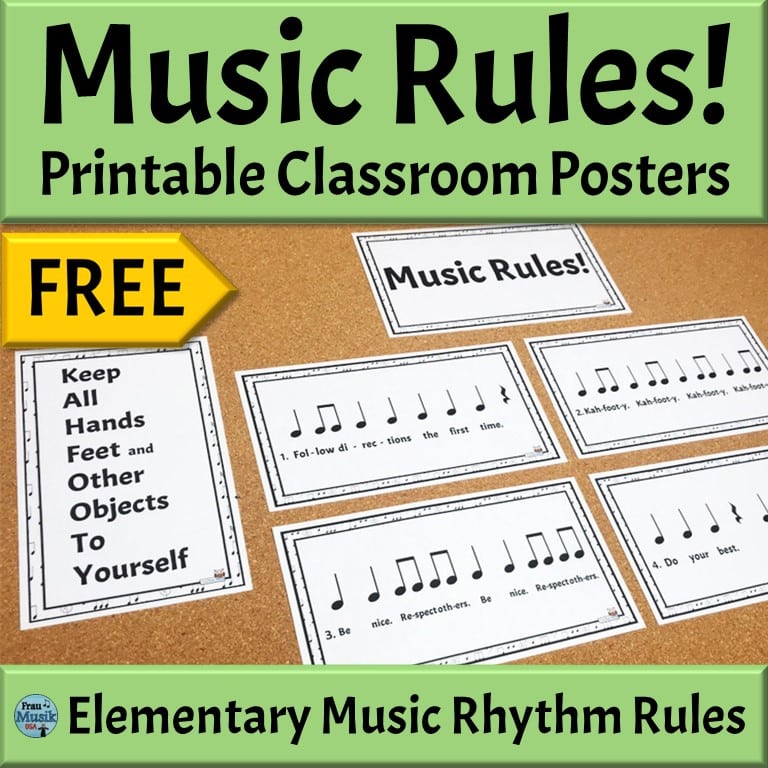
- Follow directions the first time.
- Kahfooty (Keep all hands feet and other objects to yourself.)
- Be nice. Respect others.
- Do your best.

These four rules cover almost anything that may happen. They’re easy to remember especially when set to rhythm patterns. Teach and practice your classroom rules in a variety of ways to help students internalize them.
Free Printable Rhythm Rules Posters
Download these FREE Printable Rhythm Rules Posters when you subscribe to our free email list. Mount them on colored paper to match your classroom decor and your first bulletin board is done!
Lay Down the Foundation with a Simple Drum Beat
Use a drum beat app or recording to establish a beat and keep the group together. There are LOTS of options available. I use Drum Beats+ because I can run it from my phone which is synced to our sound system. There are many options to add rhythm loops. You may already have Garage Band.
If you need more ideas for iPhone/iPad and Android backing tracks check out 12 Best Drumming Apps That You’ll Actually Use (2024).
Day 1 – Teach Rules Using Body Percussion Activities
On the first day of school (or the first day you have each class), teach rules using body percussion. Throughout the year, students will inevitably need rule reminders. Instead of repeating the rules over and over, perform the body percussion patterns without words. When students realize what you’re doing they will join in and they will supply the words themselves. If they don’t understand, prompt them by saying – “What rule matches this rhythm pattern?”
Teachers do not like to students and students don’t like to be nagged. Students will tune you out if they’re not actively engaged and reminders are not given positively. Draw them back in with gentle reminders delivered with fun body percussion prompts.
Day 2 – Practice Rules Using Classroom Rhythm Instruments
On the second day of music class it’s time to add instruments.
Early Elementary Grades
- Review each rule using the body percussion patterns you learned on Day 1.
- Then, play rules on unpitched percussion instruments.
For kindergarten and first-grade students, I like to have everyone play the same instrument. I have enough rhythm sticks and egg shakers for everyone to play at once. Even if you don’t have the same instrument for all early elementary students, have ALL students play their instruments as you practice each rhythm rule pattern. It’s HARD for young children to wait their turn to play, especially at the beginning of the school year.
Upper Elementary Grades
During the first days of school, your students may not yet be ready to perform 2-part or 4-part music. They can, however, alternate with each group performing one rhythm rule.
- Divide your class into 4 groups.
- Assign each group one rhythm rule to play on one specific rhythm instrument.
- If the class is ready, layer the rhythm rule patterns in 2 or 4 parts to create “harmony”.
- Rotate to play a different instrument.
💡 Tip: When assigning rhythm instruments, choose instruments with different timbres so students can easily hear their part.
Day 3 – Practice Rhythm Rules Using Boomwhackers
This is my favorite rule rhythm day! Kids LOVE using Boomwhackers. For early elementary grades, give each student two Boomwhackers (if you have enough) and play in “unison.” At this point, you only want Kindergarten students to match the rhythm. We don’t worry about pitches yet.
Create simple 2-note melodic patterns for upper elementary students. They should play the notated patterns for each rule. Since they only have two pitches, it’s easy for them to hear the higher and lower pitches.
Tips for Creating Melodic Rhythm Rule Patterns
Don’t have Boomwhackers? Create a similar activity using barred Orff instruments. Plan carefully to create an attainable and interesting “arrangement” of your music classroom rules.
- Use only two different pitches for each rule pattern. This is important because using two pitches per rule allows one student to play an entire rule pattern on Boomwhackers. (If you’re creating your rules to be played on melodic Orff instruments, you can ignore this suggestion.)
- Do NOT use the same pitch again in any of your rhythm patterns. This makes it possible to perform all rules at once. (Again, ignore this suggestion if you are creating for melodic Orff instruments.)
Do you have enough Boomwhackers? I purchased 6 sets of Boomwhackers and 3 sets of octavator caps. This was enough for ALL of my students to participate using 2 Boomwhackers at once.
Boomwhackers have been one of my best classroom purchases right behind Orff instruments. Boomwhackers are much more affordable and kids always LOVE playing them in a variety of music activities.
Day 4 – Add Rotation Stations
Now that your students know how to perform rhythm rules on body percussion, unpitched rhythm instruments, and Boomwhackers, you can set up rotation stations for grades 1-5. Kindergarten students are not ready for rotation patterns this early in the school year.
I recommend using a rhythmic rotation chant to guide students through the rotation process and keep the activity going. Students chant while they move to the next instrument station and begin the next “verse” immediately.
Same Rules with Differentiated Activities – Grades K-5
While your classroom rules will be the same for each grade level, the level of performance will vary greatly. Consider the following guidelines as you’re designing your rhythm rules activities. Customize them to fit your students’ music literacy levels.
Grades K-1
- Follow director cues to start/stop at the same time.
- Chant and play the rhythm of words by rote.
- Perform in unison.
Grades 2-3
- Follow director cues.
- Play rule rhythms with a steady beat in unison while reading rhythmic patterns.
- Perform in 2 parts, if ready.
Grades 4-5
- Follow director cues.
- Play rule rhythms with a steady beat in unison.
- Play rule rhythms with a steady beat in unison while reading rhythmic patterns.
- Perform in 2-4 parts, if ready.
Fun Ready-Made Music Classroom Rules Activities
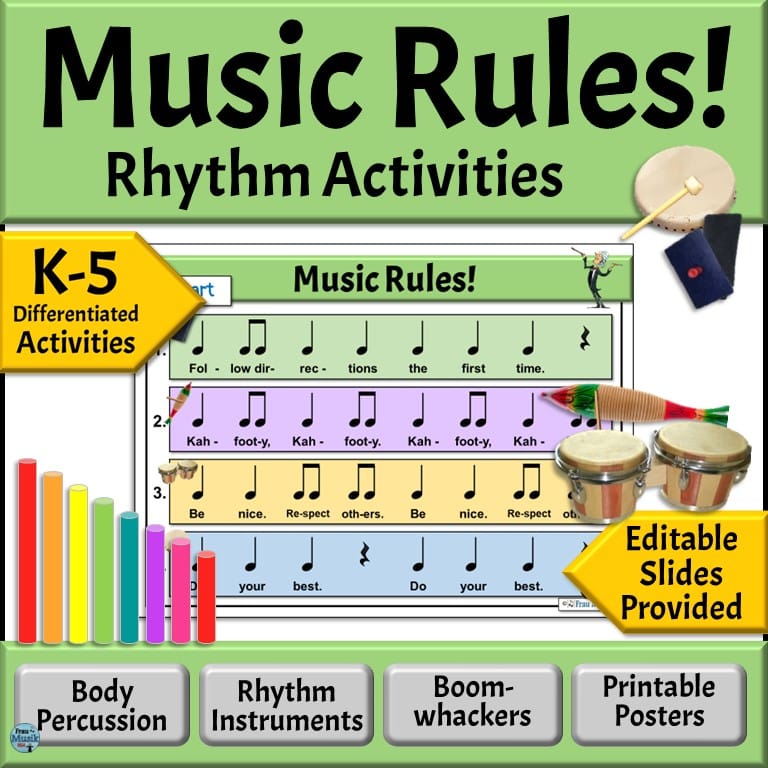
Are you strapped for time? Do you need no-prep resources to teach and implement the Rhythm Rules in your elementary music classroom? Click to preview our Music Rhythm Rules Back-to-School Music Activities.
Included in Music Rules Rhythm Activities
- Projectable PowerPoint presentation which may be used as Google Slides.
- Printable music rules POSTERS to display in your classroom.
- EDITABLE rhythm rule templates to customize rules if desired.
- Four days of activities to help you teach classroom rules for grades K-5.
That’s a lot of MULTITASKING!
Need to see what these differentiated activities could look like in your elementary music classroom? Take a peek at the videos at the end of this post.
Create Fun Musical Memories and Hook Your Students
One of my favorite Kindergarten memories. . . .
A tiny kindergarten boy bangs away 5-6 seconds after everyone else has cut off. A sense of accomplishment spreads across his face as he realizes “the music is over”. He returns his Boomwhackers to his shoulders smiling ear to ear.
Learning the rules of your elementary music classroom and how to perform musically is a process. Create fun musical memories and hook your students on Day 1. 😊
Videos: Learning Elementary Classroom Rules
If a picture is worth a thousand words, a video is worth a million. Take a peek at the videos of various grade levels performing our rhythm rules on Boomwhackers. Keep in mind these recordings were made VERY early in the school year.
The videos are not polished performances. My voice is too loud because I was too close to the camera and projecting above the drum beat accompaniment. However, you’ll get a good idea of how I successfully implemented these activities in my classroom. You’ll also see how the activities were differentiated for early, mid, and upper elementary grades.
This is REAL elementary school life. I’m proud of my students. Not only did we learn our classroom rules, we had FUN doing it.
Enjoy! 🌞
Early Elementary Grades K-1

Mid Elementary Grades 2-3

Upper Elementary Grades 4-5

Need More Back-to-School Multitasking Activities?
Do you need more ideas to integrate FUN music skills into every lesson (even the first day of school)? Check out these posts and the FREE resource guide.
- Subscribe to Our Email List and Get Free Classroom Rhythm Rules Posters
- Back-to-School Elementary Music Activities Blog Post
- Back-to-School Music Mixers Blog Post
- FREE Elementary Music Literacy Resource Guide with Music Skills Index
Boomwhackers Add Fun to Any Activity
Boomwhackers are incredibly versatile and always a hit with kids. Plus, they are budget-friendly. I bought 4 classroom sets but only added the octavator caps on 2 of those sets.
Octavator caps lower the pitch of each tube by one octave. This allows you to have 2 full octaves of notes. But, octavator caps are VERY difficult to get off once you put them on. My recommendation is to only put octavator caps on half of your Boomwhackers and leave them on. 😊
Meet the Author
Terri Lloyd is a former elementary music teacher with over 25 years of experience. She holds a Bachelor of Music, a Master of Science in Education, and a Technology Certificate in Instructional Design.
Terri is active in music education through blogging, presenting and attending workshops, and curriculum development. She serves on the music staff at her church and volunteers for an after-school children’s program. Terri is an active musician in the community, performing in a local Big Band, pit orchestras, and various events.


One Comment
Comments are closed.